> ## Documentation Index
> Fetch the complete documentation index at: https://codking.tech/documentation/llms.txt
> Use this file to discover all available pages before exploring further.
# Connect Wavecell (8x8 Connect) to COD King
> Learn how to configure Wavecell (8x8 Connect) as a Local SMS Operator in COD King.
Wavecell is now part of **8x8 Connect**. You can use 8x8 Connect to send SMS notifications through COD King.
This guide explains how to get the required credentials from 8x8 Connect and add them to COD King.
## What You Need
Before you start, make sure you have:
* An 8x8 Connect account
* Access to your 8x8 Connect dashboard
* Company information for Sender ID registration
* Access to your COD King admin panel
***
## Step 1: Log in to 8x8 Connect
Open the 8x8 Connect login page:
[https://connect.8x8.com/login](https://connect.8x8.com/login)
Log in to your account.
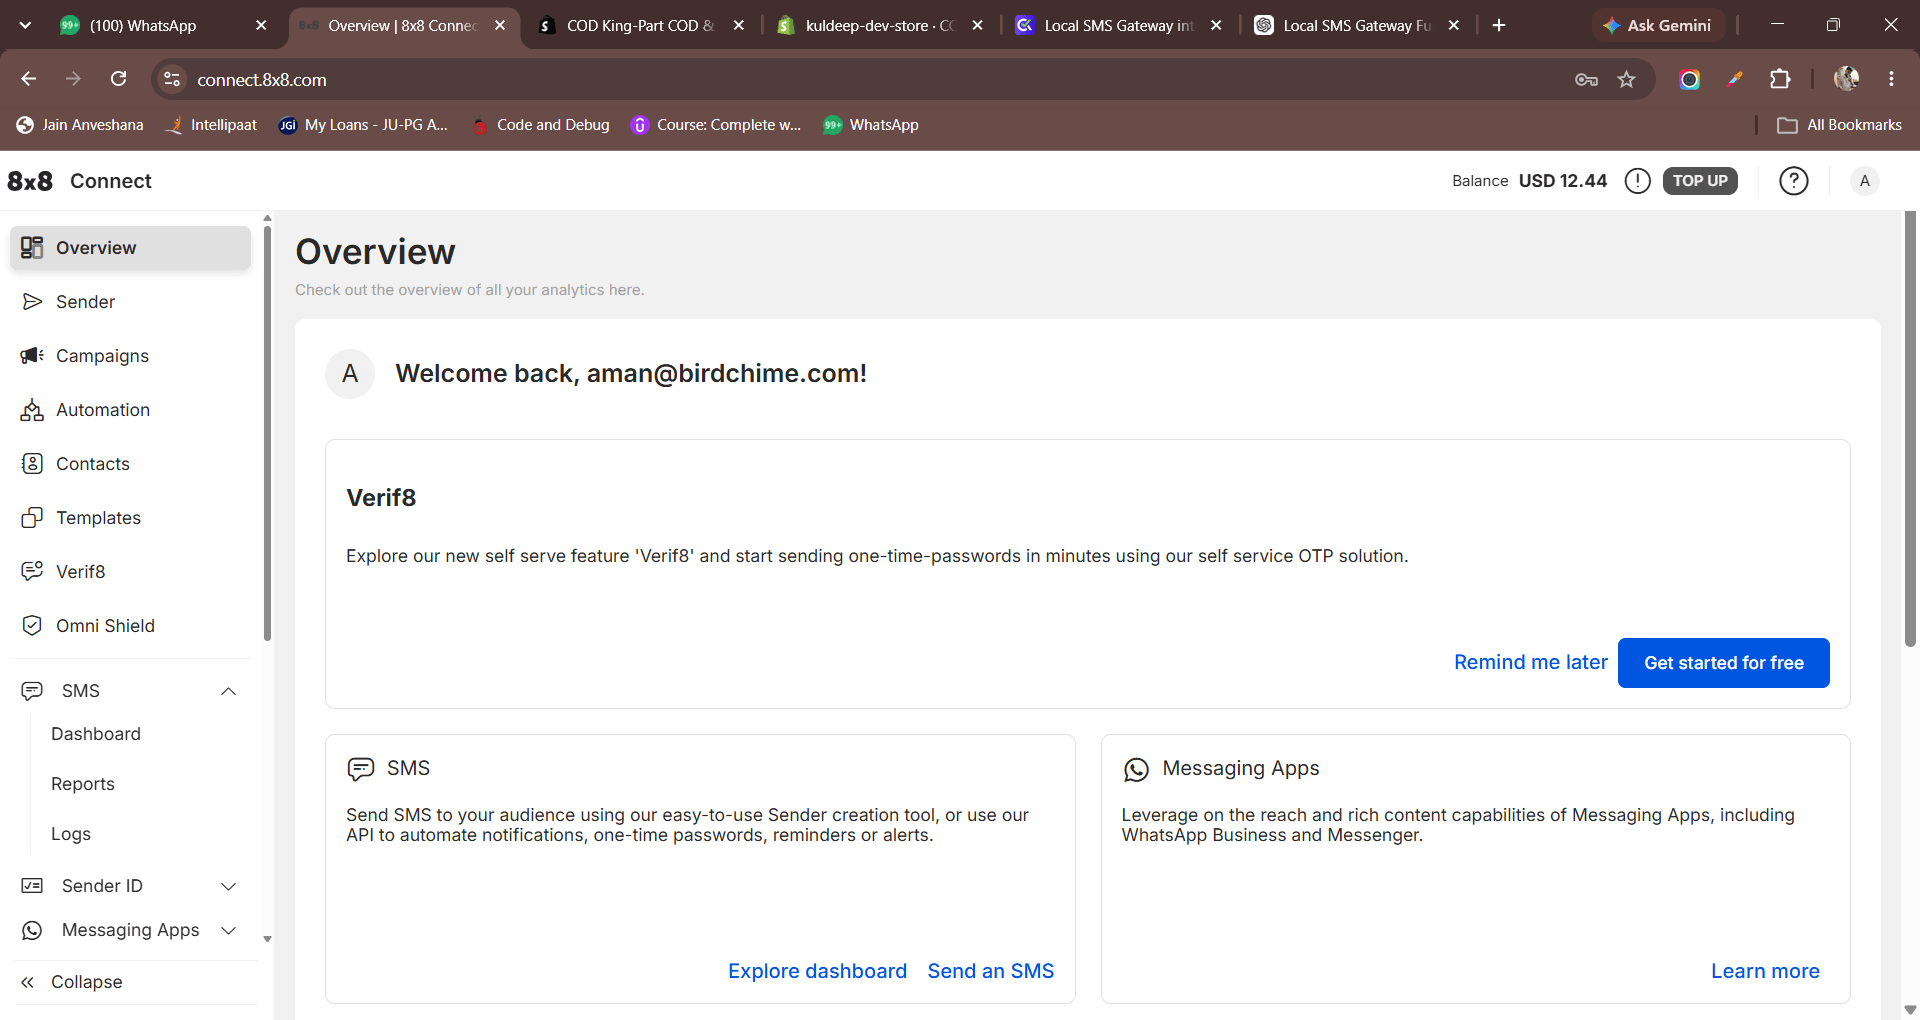
After logging in, you will see the 8x8 Connect dashboard.
>
>  >
***
## Step 2: Create an API Key
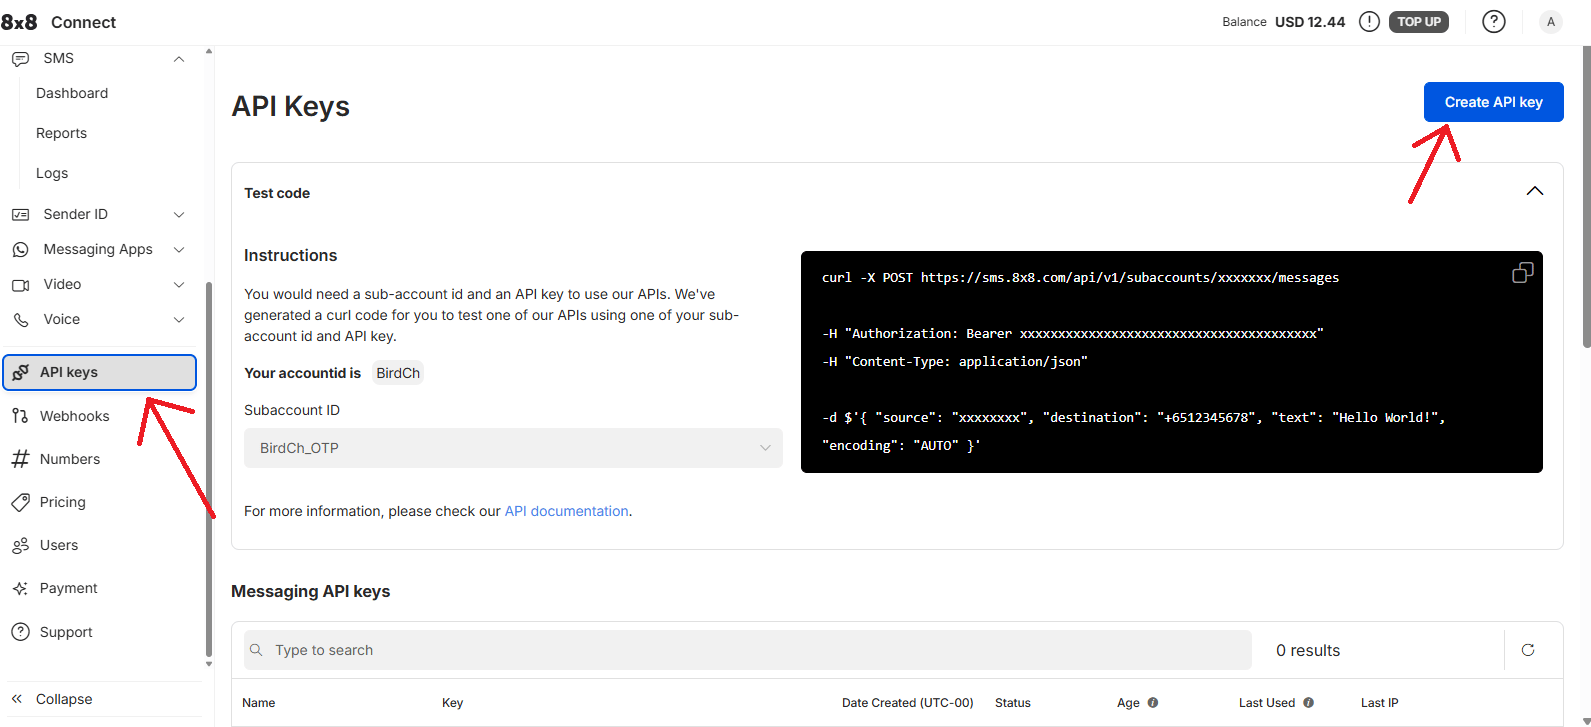
From the left-side menu, open **API Keys**.
Click **Create API key**.
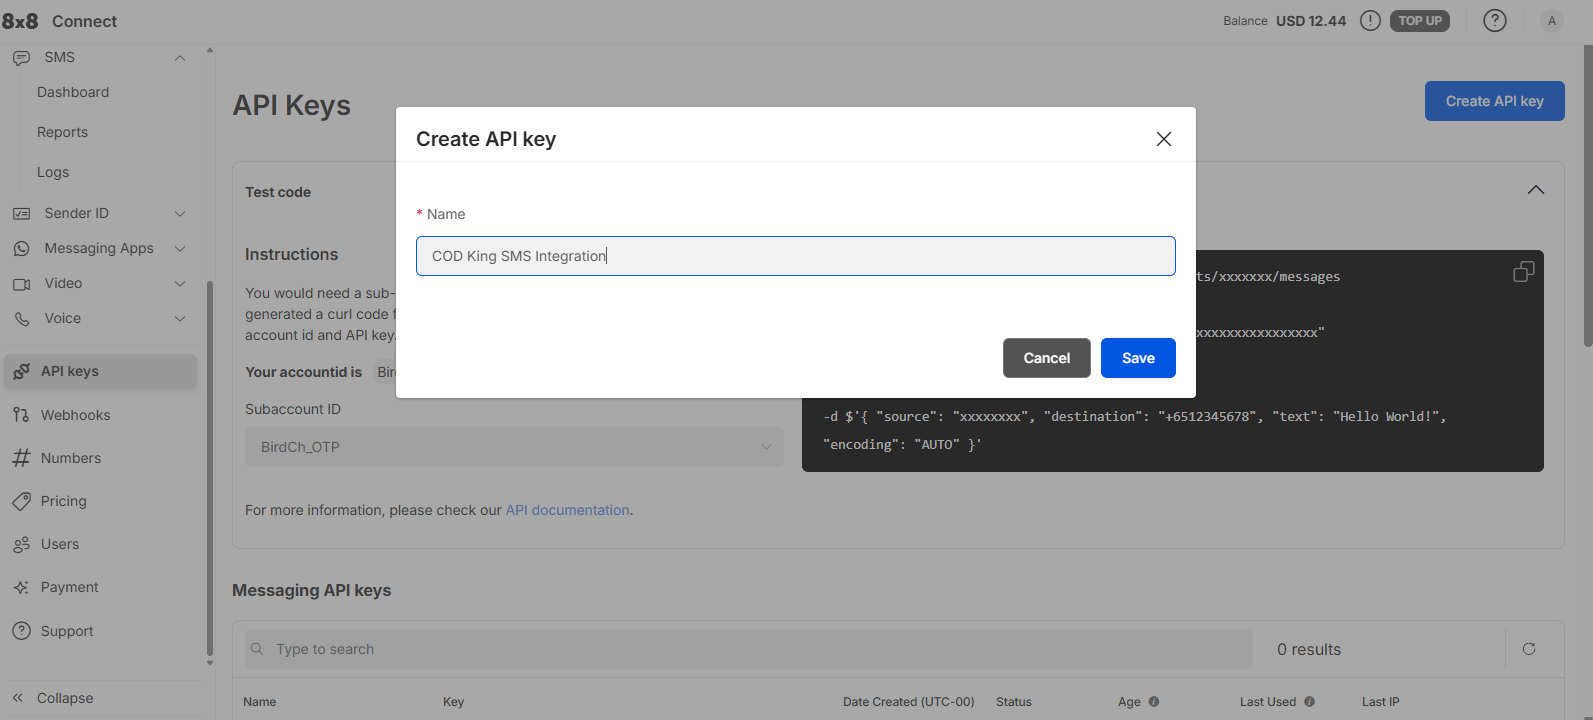
Enter a name for the API key.
For example:
`COD King SMS Integration`
Then create the API key.
>
>
>
***
## Step 2: Create an API Key
From the left-side menu, open **API Keys**.
Click **Create API key**.
Enter a name for the API key.
For example:
`COD King SMS Integration`
Then create the API key.
>
>  >
>
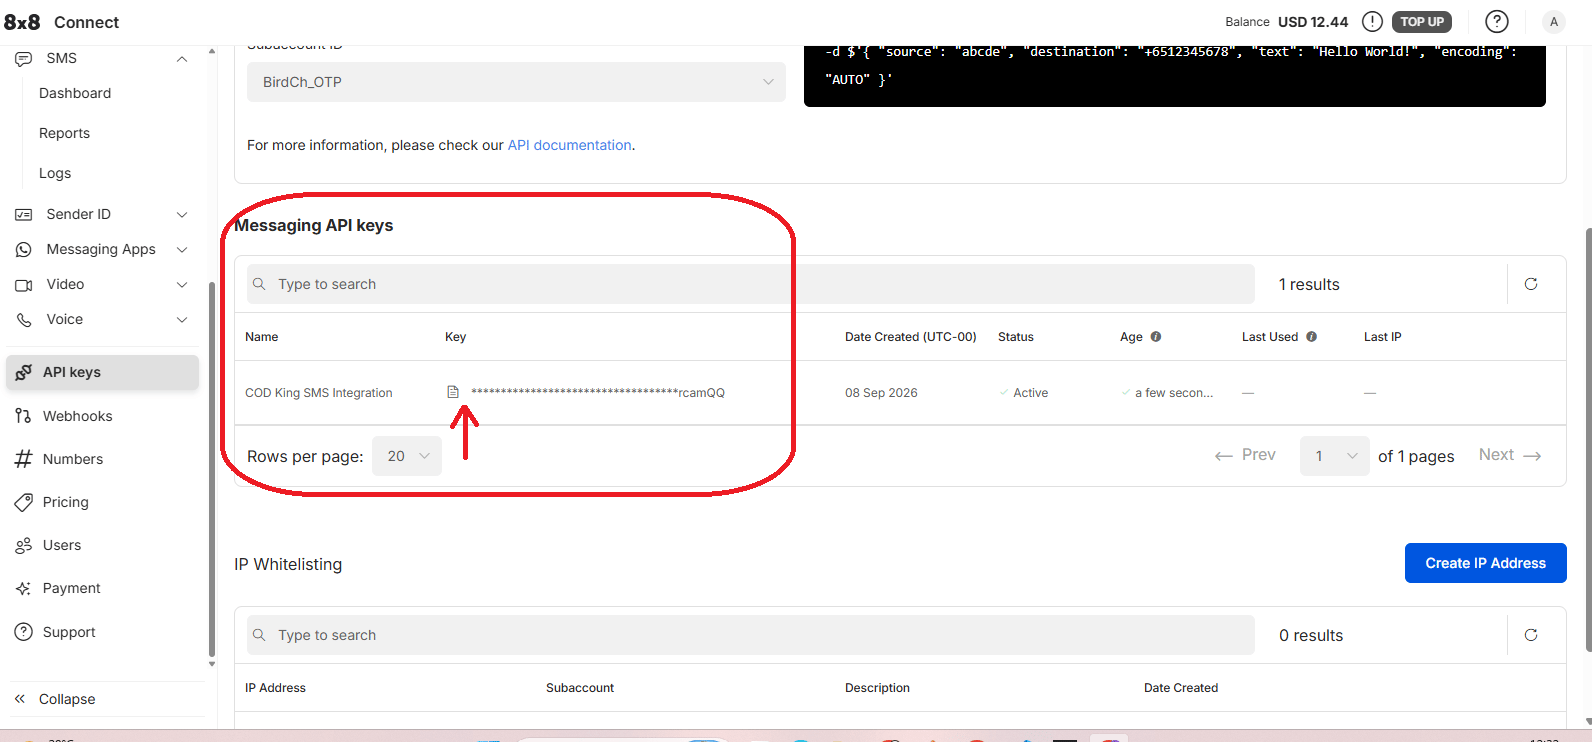 Once the API key is created, copy and save it securely.
**Important:** Do not share your API key or include the full key in screenshots.
***
## Step 3: Get the Sub Account ID
On the **API Keys** page, find the SMS Subaccount that you want to use.
Copy the **Subaccount ID**.
For example:
`BirdCh_OTP`
Your Subaccount ID may be different.
>
>
Once the API key is created, copy and save it securely.
**Important:** Do not share your API key or include the full key in screenshots.
***
## Step 3: Get the Sub Account ID
On the **API Keys** page, find the SMS Subaccount that you want to use.
Copy the **Subaccount ID**.
For example:
`BirdCh_OTP`
Your Subaccount ID may be different.
>
> 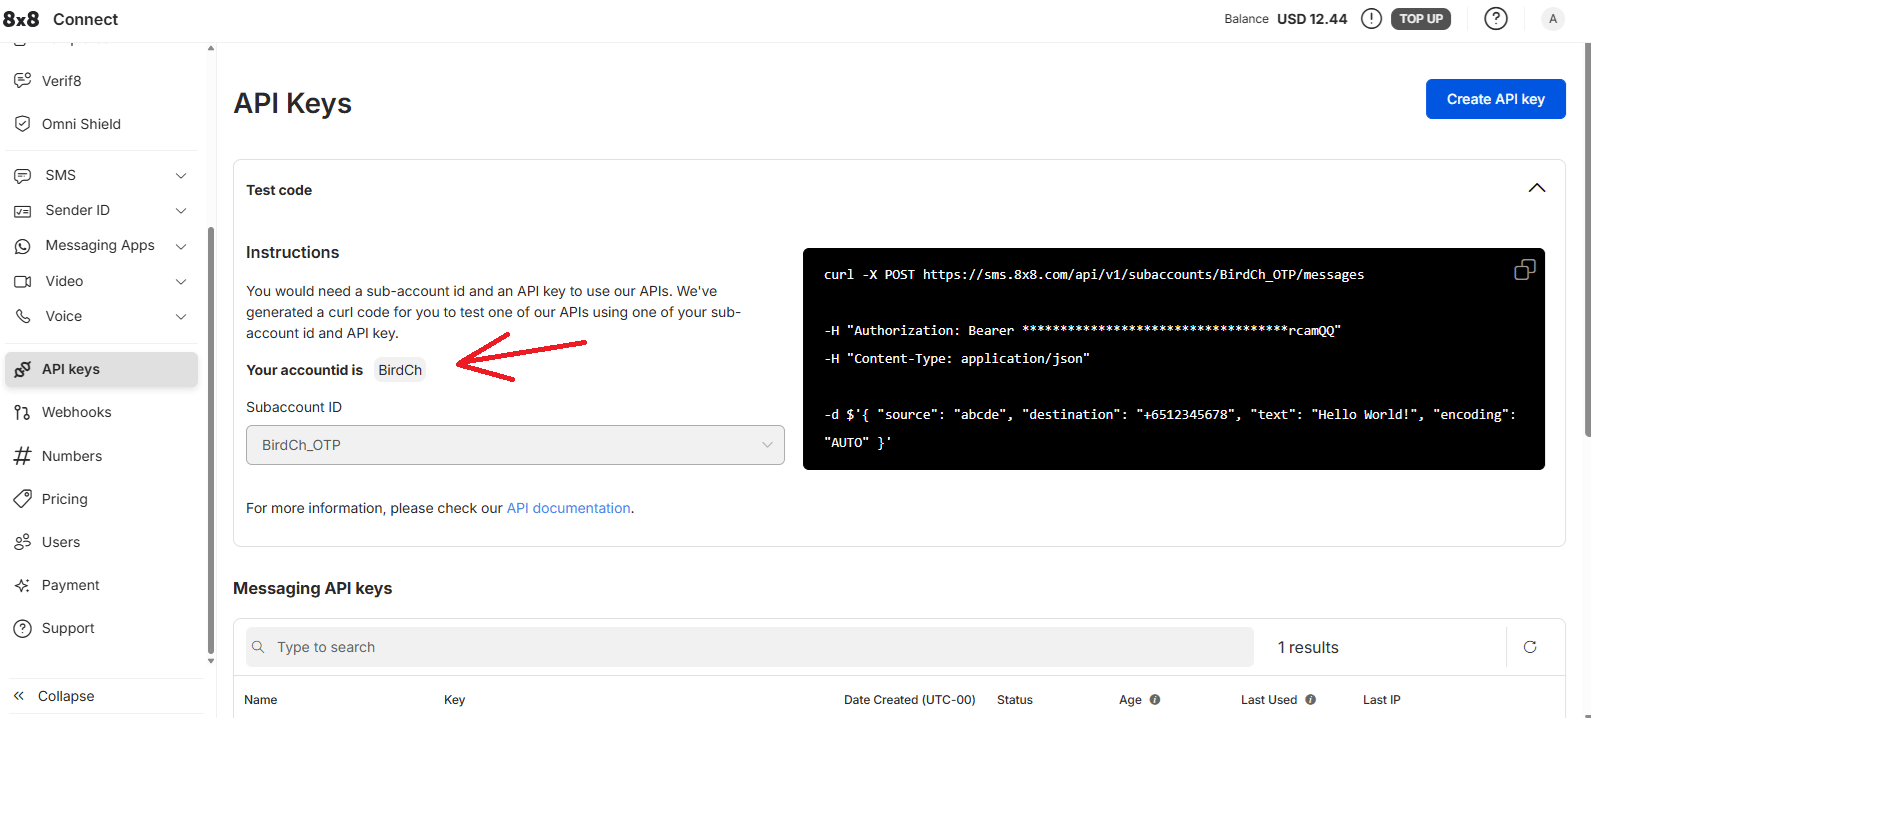 >
You will enter this value in COD King's **Sub Account ID** field.
***
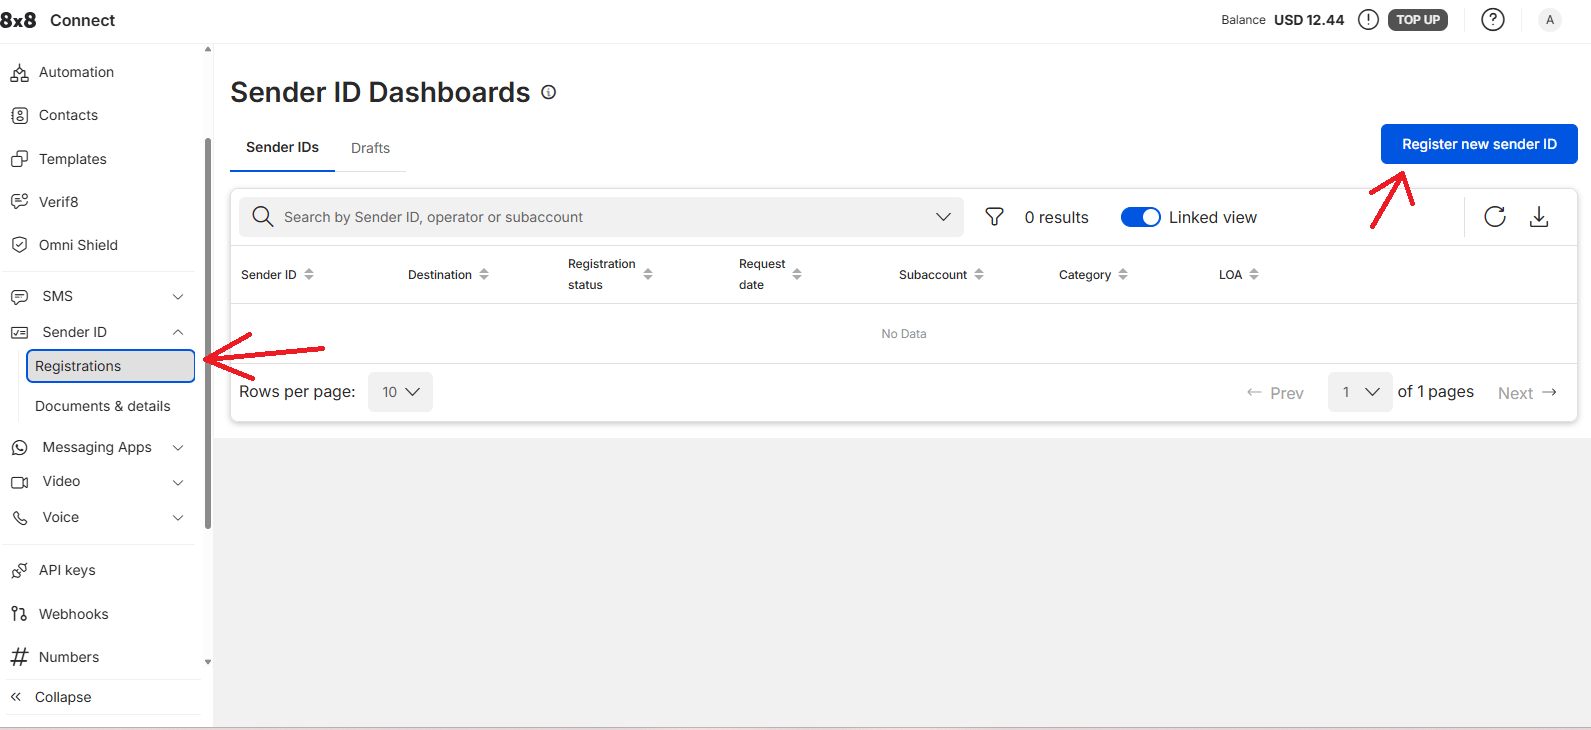
## Step 4: Register a Sender ID
From the 8x8 Connect menu, open:
**Sender ID → Registrations**
Click **Register new sender ID**.
>
You will enter this value in COD King's **Sub Account ID** field.
***
## Step 4: Register a Sender ID
From the 8x8 Connect menu, open:
**Sender ID → Registrations**
Click **Register new sender ID**.
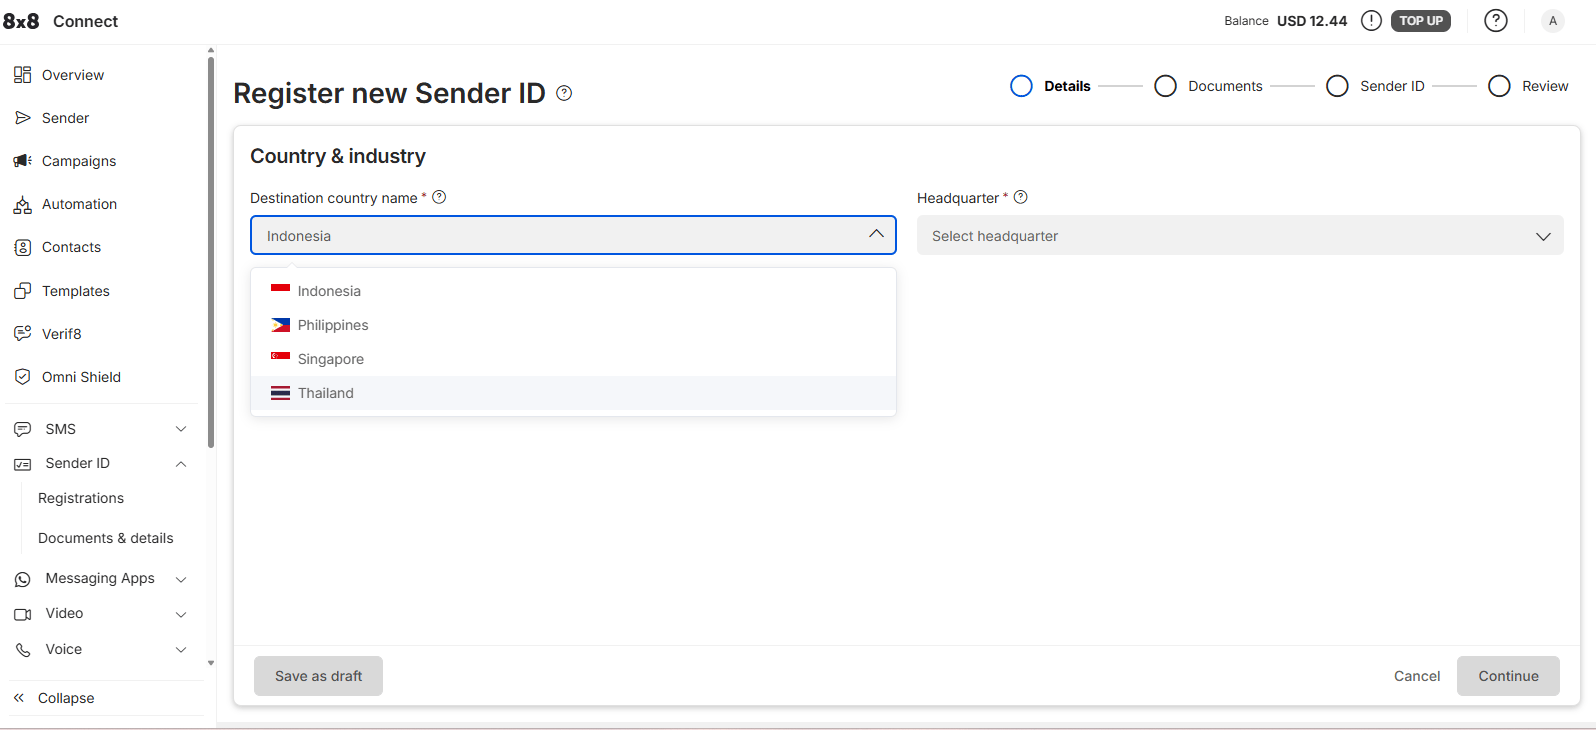
 Select the destination country where you will send SMS messages.
>
>
Select the destination country where you will send SMS messages.
>
>  >
***
## Step 5: Add Company Details
8x8 Connect will ask for your company and business information.
Enter your actual:
* Company name
* Signing officer details
* Company website
* Company address
* Country and city
* Other required business information
>
>
>
***
## Step 5: Add Company Details
8x8 Connect will ask for your company and business information.
Enter your actual:
* Company name
* Signing officer details
* Company website
* Company address
* Country and city
* Other required business information
>
> 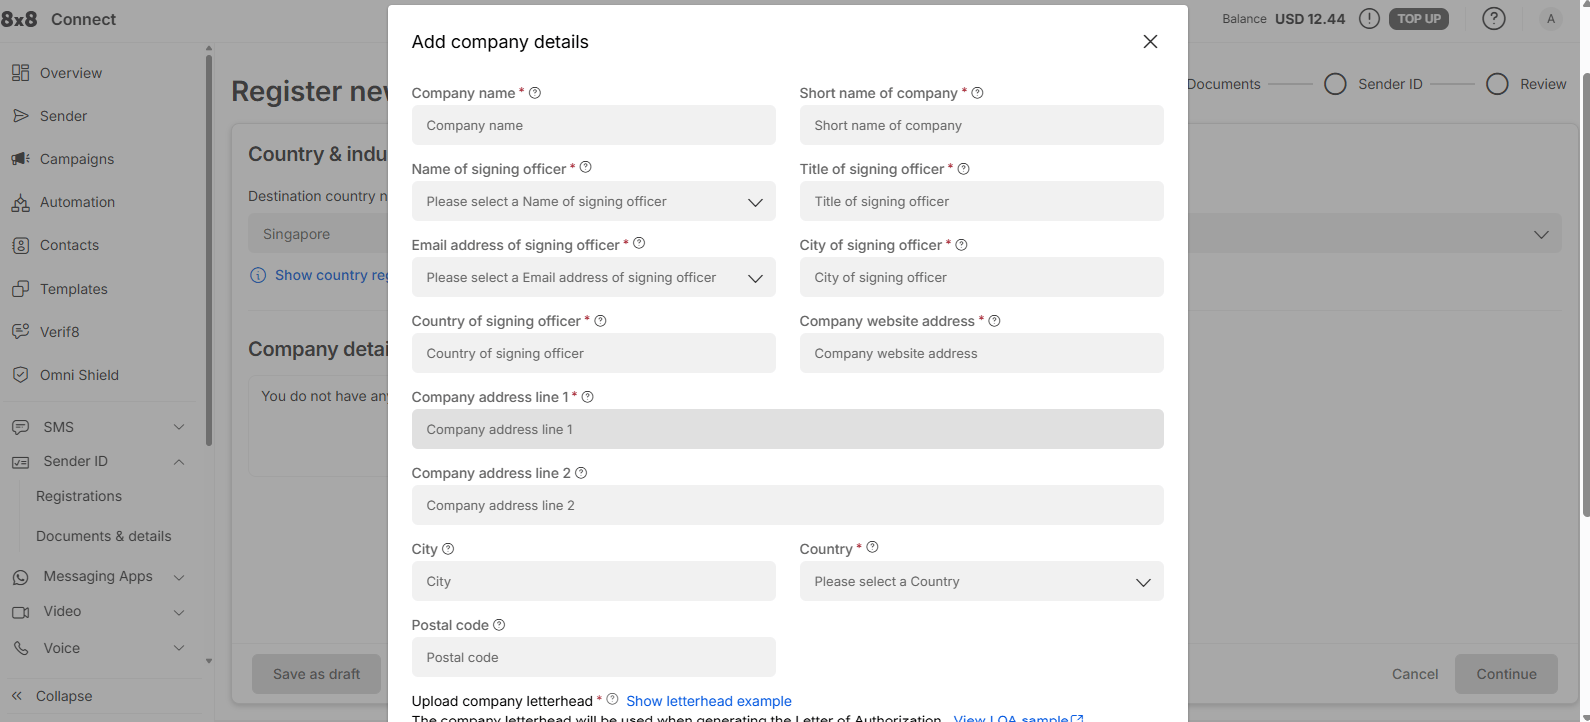 >
Upload the documents requested by 8x8 Connect.
**Use your real company information and documents. Do not use example information when submitting the registration.**
***
## Step 6: Add Your Sender ID
Enter the Sender ID that you want to use for sending SMS.
For example:
`CODKING`
Review the information and submit the registration.
Depending on the destination country, the Sender ID may need to be approved before it can be used.
***
## Step 7: Open COD King
Once you have your:
* **Sub Account ID**
* **API Key**
* **Sender ID**
Log in to your Shopify admin and open **COD King**.
Go to:
**Settings → Local SMS gateway**
>
>
>
Upload the documents requested by 8x8 Connect.
**Use your real company information and documents. Do not use example information when submitting the registration.**
***
## Step 6: Add Your Sender ID
Enter the Sender ID that you want to use for sending SMS.
For example:
`CODKING`
Review the information and submit the registration.
Depending on the destination country, the Sender ID may need to be approved before it can be used.
***
## Step 7: Open COD King
Once you have your:
* **Sub Account ID**
* **API Key**
* **Sender ID**
Log in to your Shopify admin and open **COD King**.
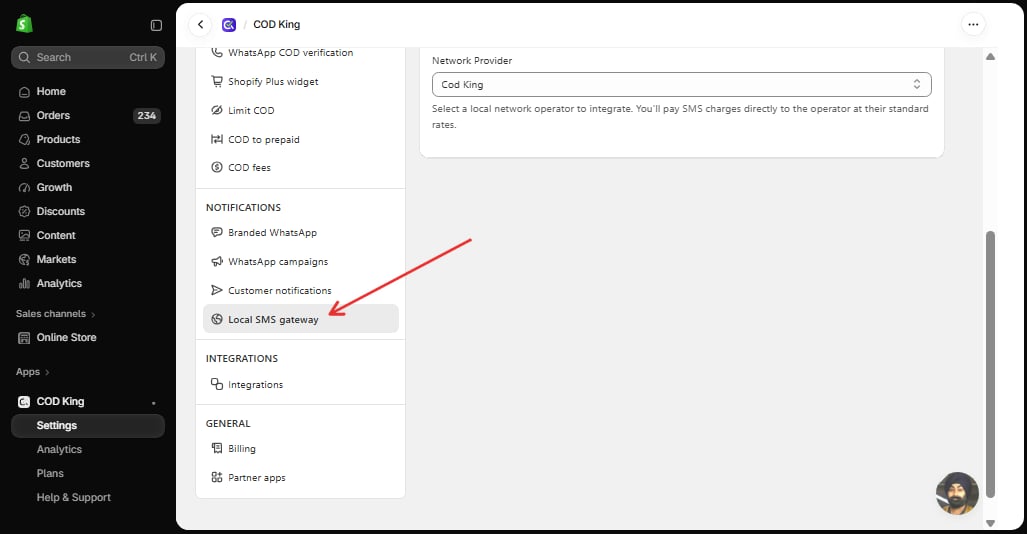
Go to:
**Settings → Local SMS gateway**
>
>  >
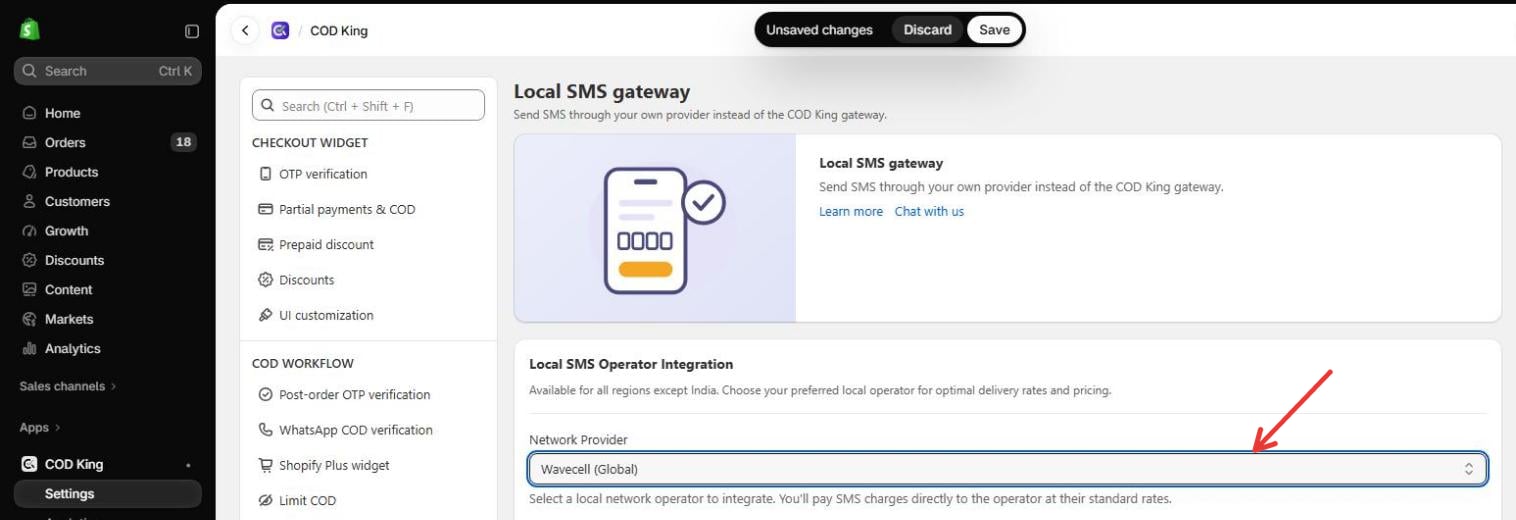
Under **Network Provider**, select:
**Wavecell (Global)**
>
Under **Network Provider**, select:
**Wavecell (Global)**
 ***
## Step 8: Enter Wavecell Details
Enter the details obtained from 8x8 Connect.
| COD King Field | Enter |
| - | - |
| **Sub Account ID** | Your 8x8 SMS Subaccount ID |
| **API Key** | Your 8x8 API Key |
| **Sender ID** | Your registered/approved Sender ID |
Make sure all three values are entered correctly.
Then click **Save** in the bar at the top of the page.
***
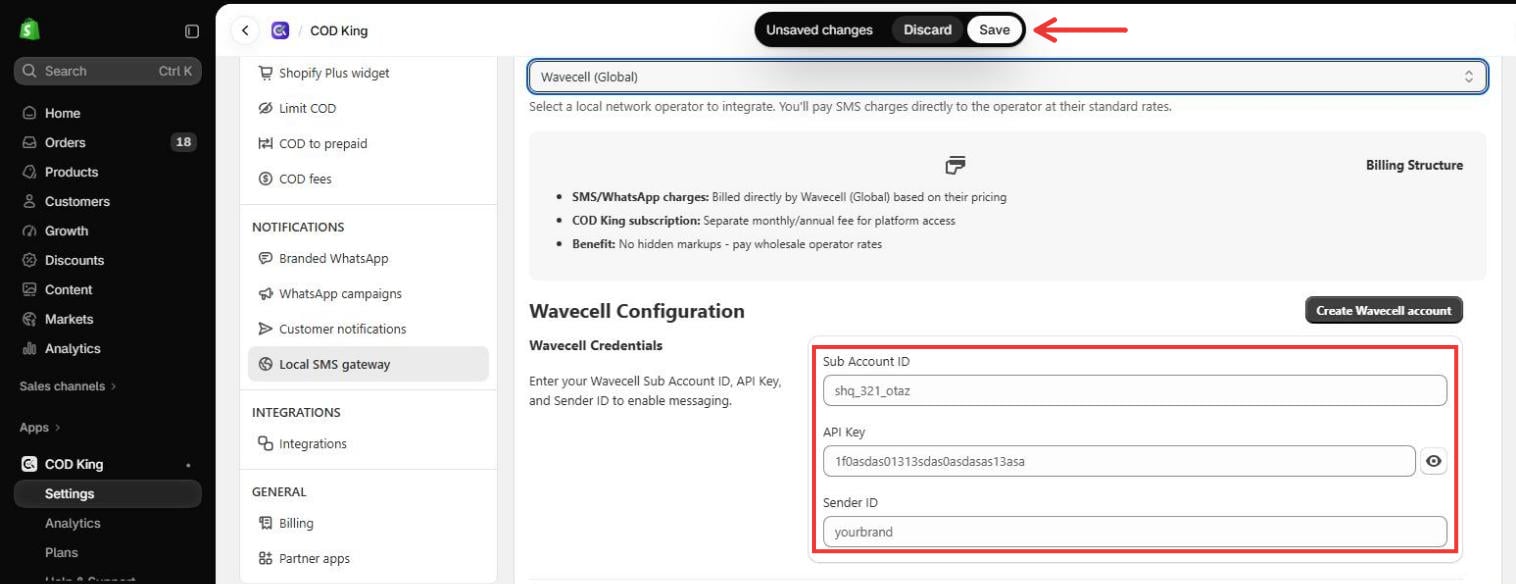
## Step 8: Enter Wavecell Details
Enter the details obtained from 8x8 Connect.
| COD King Field | Enter |
| - | - |
| **Sub Account ID** | Your 8x8 SMS Subaccount ID |
| **API Key** | Your 8x8 API Key |
| **Sender ID** | Your registered/approved Sender ID |
Make sure all three values are entered correctly.
Then click **Save** in the bar at the top of the page.
 ***
## Step 9: Test SMS
After saving the configuration, scroll down to the **Test Your Integration** section on the same page.
Enter a valid phone number with the country code in the **Phone Number** field.
Click **Send Test SMS** to send a test message to the entered phone number.
***
## Step 9: Test SMS
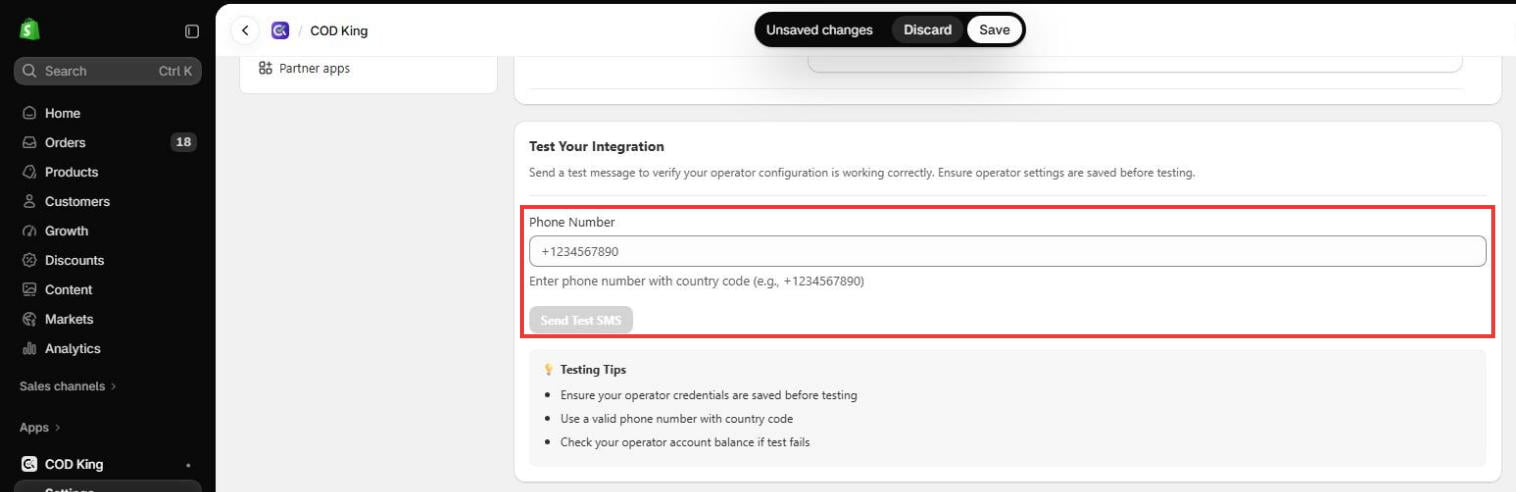
After saving the configuration, scroll down to the **Test Your Integration** section on the same page.
Enter a valid phone number with the country code in the **Phone Number** field.
Click **Send Test SMS** to send a test message to the entered phone number.
 Check the recipient's phone to confirm that the test SMS was delivered successfully.
### Testing Tips
* Ensure your operator credentials are saved before testing.
* Use a valid phone number with the country code.
* Check your wavecell account balance if the test message fails.
If the test SMS is delivered successfully, your wavecell SMS integration is configured correctly and ready to use.
## Wavecell Configuration Summary
To connect Wavecell with COD King, you need these three values:
| Required Value | Where to Get It |
| - | - |
| **Sub Account ID** | 8x8 Connect → API Keys |
| **API Key** | 8x8 Connect → API Keys |
| **Sender ID** | 8x8 Connect → Sender ID |
Once these details are entered and saved in COD King, Wavecell (8x8 Connect) is ready to send SMS notifications.
This documentation is built and hosted on [Mintlify](https://mintlify.com), a developer documentation platform.
Check the recipient's phone to confirm that the test SMS was delivered successfully.
### Testing Tips
* Ensure your operator credentials are saved before testing.
* Use a valid phone number with the country code.
* Check your wavecell account balance if the test message fails.
If the test SMS is delivered successfully, your wavecell SMS integration is configured correctly and ready to use.
## Wavecell Configuration Summary
To connect Wavecell with COD King, you need these three values:
| Required Value | Where to Get It |
| - | - |
| **Sub Account ID** | 8x8 Connect → API Keys |
| **API Key** | 8x8 Connect → API Keys |
| **Sender ID** | 8x8 Connect → Sender ID |
Once these details are entered and saved in COD King, Wavecell (8x8 Connect) is ready to send SMS notifications.
This documentation is built and hosted on [Mintlify](https://mintlify.com), a developer documentation platform.